Java/jboss
İçindekiler
- 1 How to use JBoss 3.2.5 with the Eclipse WTP plugin
- 1.1 Short version
- 1.2 How to build a JBOSS 3.2.5 Server Definition for Eclipse Web Tools Platform
How to use JBoss 3.2.5 with the Eclipse WTP plugin
The wtp project extends the Eclipse platform with tools for developing J2EE Web applications. The WTP project includes the following tools: source editors for HTML, Javascript, CSS, JSP, SQL, XML, DTD, XSD, and WSDL; graphical editors for XSD and WSDL; J2EE project natures, builders, and models and a J2EE navigator; a Web service wizard and explorer, and WS-I Test Tools; and database access and query tools and models.
After you have installed the WTP plugin ( instructions here ) and start Eclipse you will realize that you can not add JBoss 3.2.5 (included in SL10.0 and SL10.1) as a web server.
This how-to will show what steps are necessary in order to use JBoss 3.2.5 with the Eclipse WTP 1.0
Short version
If you are somewhat nervous and you want it working NOW, just follow this short version of the article. Note however, that it will overwrite a few files of the original plugins and that the plugin probably lacks some of its original web server capabilities. Especially when using a WTP version > 1.0 you should rather follow the #How to build a JBOSS 3.2.5 Server Definition for Eclipse Web Tools Platform section, as it does not delete any information but describes how to only add new information for JBoss 3.2.5 usage!
Preparation
- Download this tar archive to /tmp
- Become root and change directory to the serverdefinition directory of the WTP plugin:
su
cd /usr/share/eclipse/plugins/org.eclipse.jst.server.generic.serverdefinitions*
- In order to be able to rollback to the original configuration make a backup of the original files in this directory:
tar -jcf backup.tar.bz2 *
... so, in order to recreate the original configuration, you would have to change to the directory again and unpack this backup file:
cd /usr/share/eclipse/plugins/org.eclipse.jst.server.generic.serverdefinitions*
tar -jxf backup.tar.bz2
- Now (still in the /usr/share/eclipse/plugins/org.eclipse.jst.server.generic.serverdefinitions* directory), call
tar -jxf /tmp/jboss325-files.bz2
Konfiguration
- start eclipse with the clean option:
eclipse -clean
- in Eclipse open the preferences dialog under "Window/Preferences", and
- go to "Server/Installed Runtime Environments".
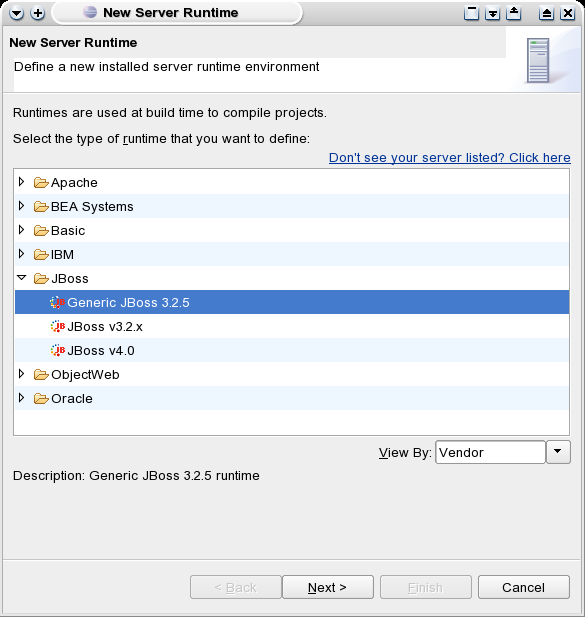
- press the "Add" button and select JBoss 3.2.5:
- press "Next"
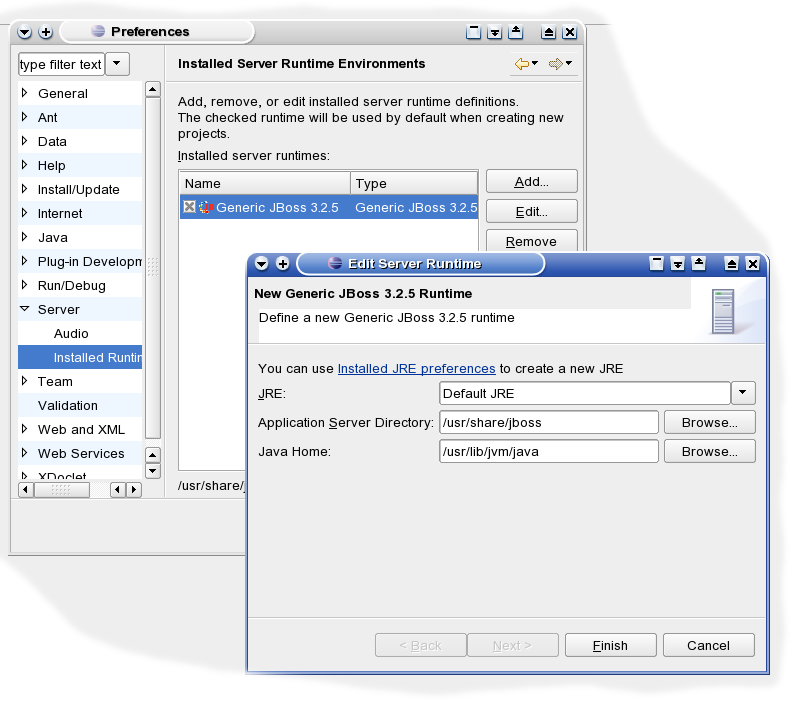
- adjust the configuration as shown in the following image:
- Press "Finish" and check the checkbox of the created JBoss 3.2.5 entry
... your JBoss 3.2.5 was now added as a server runtime.
Now, to the original article, which describes step by step what has to be done in order to add JBoss 3.2.5 manually:
How to build a JBOSS 3.2.5 Server Definition for Eclipse Web Tools Platform
original article by Mark Szulc with minor updates provided by David O'Hanlon
Summary
The Web Tools Platform (WTP) comes with a number of Server Defintions representing J2EE application servers. The server defintion for JBoss is only for version 3.2.3 [...]. This document describes how to create a new server definition for JBoss 3.2.5 which WTP can use as an application server.
Information
The Server Defintion files for WTP are stored in the eclipse plugins folder under the/usr/share/eclipse/plugins/org.eclipse.jst.server.generic.serverdefinitions_<version_number>sub-folder. This sub-folder contains all server definitions and associated files to allow WTP/Eclipse to include a specific Java application server during J2EE development.
Creating a new server definition for JBoss 3.2.5 will require the following new files:
   * servers/jboss325.serverdef
   * buildfiles/jboss325.xml
Additional, the following files must be modified
   * plugin.properties
   * plugin.xml
Download Sample Source Definition: jboss325-files.tar.bz2
Instructions:
Modify plugin.properties
The plugin.properties file provides a location to store static string values for labels, etc. Add the following lines after the jboss323 section:
# ============ jboss325 ====================

jboss325runtimeTypeName=Generic JBoss 3.2.5
jboss325runtimeTypeDescription= Generic JBoss 3.2.5 runtime

jboss325serverTypeName=Generic JBoss 3.2.5
jboss325serverTypeDescription=Generic JBoss 3.2.5 server
In the same file, add two new properties in the serverdef translations section with the following
jboss325serverConfig=Server Co&nfiguration (minimal/default/all)
javaHome=Java Home:
Modify plugin.xml
The plugin.xml file provides the link between the actual server definition (stored in the servers folder) and Eclipse/WTP. There are a number of sections which need to be extended in order to have Eclipse/WTP recognise the new server definition.
runtimeTypes
Under the first <extension> node, you will see a list of runtimeType nodes. Each node represents the runtime properties of each server. You will need to add the following runtimeType for JBoss 3.2.5
<runtimeType
   id="org.eclipse.jst.server.generic.runtime.jboss325"
   name="%jboss325runtimeTypeName"
   description="%jboss325runtimeTypeDescription"
   vendor="%jbossCategory"
   version="3.2.5"
   class="org.eclipse.jst.server.generic.core.internal.GenericServerRuntime"
   >
   <moduleType
     types="jst.web"
     versions="2.2, 2.3"/>
  <moduleType
     types="jst.ejb"
     versions="1.1, 2.0"/>
  <moduleType
     types="jst.ear"
     versions="1.2, 1.3"/>
  <moduleType
     types="jst.connector"
     versions="1.0"/>
   <moduleType
     types="jst.utility"
     versions="1.0"/>
</runtimeType>
serverTypes
Under the second <extension> node, you find the server properties. Add the following <serverType> to the list
<serverType
     runtime="true"
     class="org.eclipse.jst.server.generic.core.internal.GenericServer"
     id="org.eclipse.jst.server.generic.jboss325"
     initialState="stopped"
     supportsRemoteHosts="false"
     runtimeTypeId="org.eclipse.jst.server.generic.runtime.jboss325"
     description="%jboss325serverTypeDescription"
     launchConfigId="org.eclipse.jst.server.generic.core.launchConfigurationType"
     behaviourClass="org.eclipse.jst.server.generic.core.internal.GenericServerBehaviour"
     name="%jboss325serverTypeName"
     startTimeout="250000"
 stopTimeout="15000"
     hasConfiguration="false"
     launchModes="run,debug,profile">
</serverType>
wizardFragments
Under the third <extension> node, you find the wizard fragment properties representing the wizards for Runtime and Server Types. The new Server definition will make use of the default generic wizards which come with Eclipse/WTP. Add the following 2 <fragment> nodes to the this list of UI components
<fragment
  id="org.eclipse.jst.server.generic.runtime"
  typeIds="org.eclipse.jst.server.generic.runtime.jboss325"
  class="org.eclipse.jst.server.generic.ui.internal.GenericServerRuntimeWizardFragment"/>
<fragment
  id="org.eclipse.jst.server.generic.server"
  typeIds="org.eclipse.jst.server.generic.jboss325"
  class="org.eclipse.jst.server.generic.ui.internal.GenericServerWizardFragment"/>
serverImages
Under the fourth <extension> node, you find the icon images which the Eclipse/WTP UI will make use of. You can add new icons to represent the servers within the Eclipse UI here. For now, we will make use of the existing JBoss 3.2.3 icons. However, you still need to make a new entry to map the icons to the server definition using the following
<image
   id="org.eclipse.jst.server.generic.image"
   icon="icons/obj16/jboss.gif"
   typeIds="org.eclipse.jst.server.generic.runtime.jboss325"/>
<image
   id="org.eclipse.jst.server.generic.image"
   icon="icons/obj16/jboss.gif"
   typeIds="org.eclipse.jst.server.generic.jboss325"/>
serverDefinition
Under the last <extension> node, you find the link to the server definition file which the Eclipse/WTP UI will use to define the properties of the application server itself (i.e. How to start, stop, include libraries, etc.) It is important that you link the serverDef file in the servers folder to the servers types defined in the previous steps. The id is used to create the mapping between this file and the rest of the properties in this xml file. Add the following server definition to the end of this list
<serverdefinition id="org.eclipse.jst.server.generic.runtime.jboss325" definitionfile="/servers/jboss325.serverdef">
</serverdefinition>
Add jboss325.serverdef to servers sub-folder
The serverDef file contains the server runtime environment definition for the specific application server. It contains information on how to start the application server alongside any startup parameters to the java virtual machine. Also, determines the libraries to use during the startup bootstrap of the application server. The serverDef file for JBoss 3.2.5 should contain the following XML:
<?xml version="1.0" encoding="UTF-8"?>
<tns:ServerRuntime
	xmlns:tns="http://eclipse.org/jst/server/generic/ServerTypeDefinition"
	xmlns:xsi="http://www.w3.org/2001/XMLSchema-instance"
	xsi:schemaLocation="http://eclipse.org/jst/server/generic/ServerTypeDefinition ServerTypeDefinitionSchema.xsd "
	name="JBOSS 4.0" version="v4.0">
<property id="serverRootDirectory"
	label="%ApplicationServerDirectory"
	type="directory"
	context="runtime"
	default="/your_server_root/appservers/jboss-4.0.3" />
<property id="serverAddress"
	label="%serverAddress"
	type="string"
	context="server"
	default="127.0.0.1" />
<property id="port"
	label="%serverPort"
	type="string"
	context="server"
	default="8080" />
<property id="jndiPort"
	label="%jndiPort"
	type="string"
	context="server"
	default="1099" />
<property id="serverConfig"
	label="%jboss323serverConfig"
	type="select"
	context="server"
	default="default,all,minimal" />

	<port>
		<no>${port}</no>
		<name>Http</name>
		<protocol>http</protocol>
	</port>

	<module>
		<type>jst.web</type>
		<publishDir>${serverRootDirectory}/server/${serverConfig}/deploy</publishDir>
		<publisherReference>org.eclipse.jst.server.generic.antpublisher</publisherReference>
	</module>
	<module>
		<type>jst.ejb</type>
		<publishDir>${serverRootDirectory}/server/${serverConfig}/deploy</publishDir>
		<publisherReference>org.eclipse.jst.server.generic.antpublisher</publisherReference>
	</module>
	<module>
		<type>jst.ear</type>
		<publishDir>${serverRootDirectory}/server/${serverConfig}/deploy</publishDir>
		<publisherReference>org.eclipse.jst.server.generic.antpublisher</publisherReference>
	</module>


	<project>
		<classpathReference>jboss.project</classpathReference>
	</project>

	<start>
		<mainClass>org.jboss.Main</mainClass>
		<workingDirectory>${serverRootDirectory}/bin</workingDirectory>
		<programArguments>-c ${serverConfig}</programArguments>
		<vmParameters>-Dprogram.name=run.bat -Djava.endorsed.dirs=${serverRootDirectory}/bin/../lib/endorsed -Xms128m -Xmx512m</vmParameters>
		<classpathReference>jboss</classpathReference>
	</start>

	<stop>
		<mainClass>org.jboss.Shutdown</mainClass>
		<workingDirectory>${serverRootDirectory}/bin</workingDirectory>
		<programArguments>-S</programArguments>
		<vmParameters>-Djboss.boot.loader.name=shutdown.bat</vmParameters>
		<classpathReference>jboss.shutdown</classpathReference>
	</stop>
	<publisher id="org.eclipse.jst.server.generic.antpublisher">
		<publisherdata>
			<dataname>build.file</dataname>
			<datavalue>/buildfiles/jboss323.xml</datavalue>
		</publisherdata>
		<publisherdata>
			<dataname>target.publish.jst.web</dataname>
			<datavalue>deploy.j2ee.web</datavalue>
		</publisherdata>
		<publisherdata>
			<dataname>target.publish.jst.ejb</dataname>
			<datavalue>deploy.j2ee.ejb</datavalue>
		</publisherdata>
		<publisherdata>
			<dataname>target.unpublish.jst.web</dataname>
			<datavalue>undeploy.j2ee.web</datavalue>
		</publisherdata>
		<publisherdata>
			<dataname>target.unpublish.jst.ejb</dataname>
			<datavalue>undeploy.j2ee.ejb</datavalue>
		</publisherdata>
		<publisherdata>
			<dataname>target.publish.jst.ear</dataname>
			<datavalue>deploy.j2ee.ear</datavalue>
		</publisherdata>
		<publisherdata>
			<dataname>target.unpublish.jst.ear</dataname>
			<datavalue>undeploy.j2ee.ear</datavalue>
		</publisherdata>
	</publisher>

	<classpath id="jboss" >
		<archive path="${serverRootDirectory}/bin/run.jar" />
	</classpath>
	<classpath id="jboss.shutdown" >
		<archive path="${serverRootDirectory}/bin/shutdown.jar" />
	</classpath>

	<classpath id="jboss.project" >
		<archive path="${serverRootDirectory}/client/jboss-j2ee.jar" />
		<archive path="${serverRootDirectory}/server/default/lib/javax.servlet.jar" />
		<archive path="${serverRootDirectory}/server/default/lib/javax.servlet.jsp.jar" />
		<archive path="${serverRootDirectory}/server/default/lib/activation.jar" />
		<archive path="${serverRootDirectory}/server/default/lib/mail.jar" />
	</classpath>
	<jndiConnection>
		<providerUrl>jnp://${serverAddress}:${jndiPort}</providerUrl>
		<initialContextFactory>org.jnp.interfaces.NamingContextFactory</initialContextFactory>
		<jndiProperty>
			<name></name>
			<value></value>
		</jndiProperty>
	</jndiConnection>
</tns:ServerRuntime>
Add jboss325.xml to buildfiles sub-folder
This file represents the build file which Eclipse will use to build and deploy your J2EE application to your application server.
The best way to create this file is to use the jboss323.xml as a template. Make a copy of jboss323.xml and rename it to jboss325.xml. No further modifications are required to the contents of this file as the structure and deployment is the same as version 3.2.3 of JBoss.
Execute clean Eclipse
If you have executed Eclipse previously, Eclipse will have cached the existing server definition files. Executing Eclipse normally after changing any of the files mentions in steps 1 through 4, will not have any effect. You must run Eclipse in clean mode by using the following on the command line:
eclipse -clean
Verify Server Runtime
- in Eclipse open the preferences dialog under "Window/Preferences", and
- go to "Server/Installed Runtime Environments".
- press the "Add" button and select JBoss 3.2.5:
- press "Next"
- adjust the configuration as shown in the following image:
- Press "Finish" and check the checkbox of the created JBoss 3.2.5 entry
Special thanks to Adobe's David O'Hanlon and Mark Szulc for the information above.
Drop me a mail if you experience any problems.

