How to Add a VM
İçindekiler
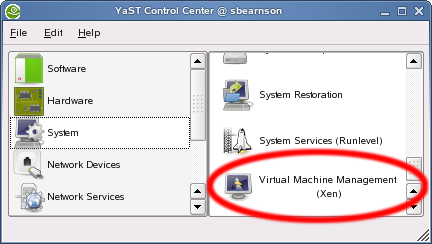
Launch YaST's VMM Module
After completing the steps in How to Install a Xen VM Server, you can use YaST to add VMs. The YaST module makes it so easy!
- Launch YaST Control Center.
- Click System > Virtual Machine Management (Xen).
- From the Manage Virtual Machines screen, click Add.
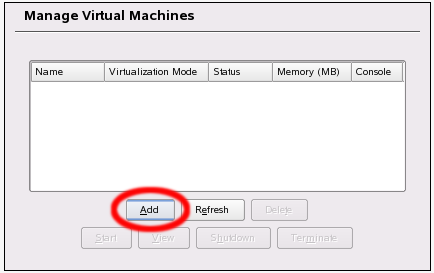


Prepare the Virtual Machine Environment
- Choose which method to use to set up the VM's operating system. You can run an OS installation program or use an already-installed disk or disk image that contains OS boot files.
- If you choose to use an already-installed disk or disk image, skip to the How_to_Add_a_VM#Using an Already-Installed Disk Image section.
- If you choose to run an OS installation program, continue with the next step.
- Change the settings (as required). When the OS installation program runs and loads into memory, it will recognize these settings as its virtual machine environment.
- AutoYaST profile
- Virtualization mode
- VM properties such as VM name
- Virtual hardware settings, such as allocated memory size, number of CPUs, and hardware clock
- Virtual disk settings, such as size (such as 4GB) and type (such as a sparse image file or a "real" populated file)
- Virtual network card settings, such as number of cards, MAC address, DHCP, and IP address.
- Location of operating system installation program, such as CD/DVD, ISO image files, or network installation source.
- If you are installing from CD or DVD, insert CD1 or DVD1 into the CD reader.
- After reviewing and changing the settings (as required) on the Virtual Machine (Installation Settings) screen, launch the OS installation program by clicking Next. A new window opens and displays the first screen of the OS installation program.
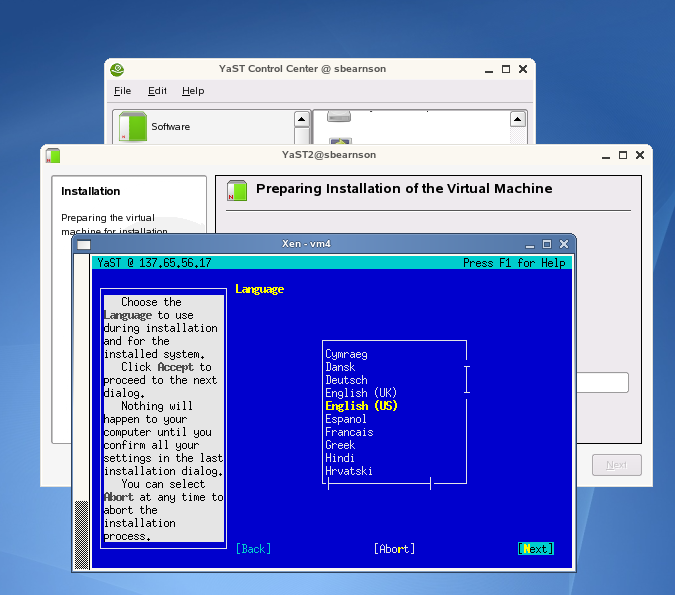

Run the OS Installation Program
The first part of the installation program loads itself into memory and prompts you to choose a language, an installation mode, and a timezone.
- Complete each screen following the onscreen instructions. Make adjustments (as required) to the Installation Settings screen. Hint: Usually, no adjustments are required.
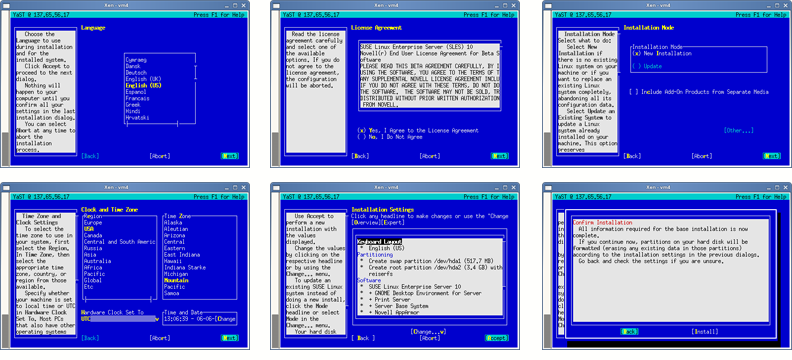
- Read the Confirm Installation message.
- When you are satisfied with the settings, continue to the next section.

Copy OS Files to the VM's Disk
The second part of the OS installation program formats and copies files to the hard disk.
- From the Confirm Installation screen, click Install to continue the installation.
- If installing from CD, insert CD1, CD4, and then reinsert CD1 as prompted by the program.
- The files are copied from CD 1 and the VM automatically reboots.
Boot the VM's OS from the VM's Disk
When the VM boots its operating system, the Installation Complete screen appears.
- Click Continue on the
- Make any changes (as required) to the Virtual Machine (Final Settings) screen, and then click Next.
- The VM starts in a separate window and continues the OS installation program.
- If you are installing from DVD or using a Network Installation Source, skip to Step ??. If you are installing from CDs or ISO image files, you will receive the following message:
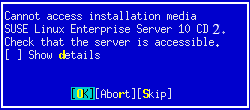
- DO NOT EJECT THE CD! Instead of inserting the requested CD, you must complete the following steps each time you switch CDs:
- Open a terminal window and enter xm list. Note the name and the ID of the VM you are creating.
- Enter xm block-list vm_ID where vm_ID is the ID number of the VM. Decide which device is the mounted ISO image and note its Vdev number. Usually the last device displayed in the list is a mounted ISO image because the first devices are usually disk drives.
- Enter xm block-detach vm_ID Vdev_number. This command detaches the connection between the VM and the CD reader. For example, xm block-detach 1 832 detaches the the connection between VM ID 1 and Vdev 832.
- Enter eject to eject the CD.
- Insert the next CD (for example, CD2).
- Enter cat /etc/xen/vm/vm_name | grep disk where vm_name is the name of the VM you are creating. Note the attach string of the CD reader, which is usually listed towards the end of the output string and prefaced with phy: (for example, phy:/dev/sr0,hdb,r).
- Enter xm block-attach vm_ID attach_string where vm_ID is the VM’s ID number and attach_string is the attach string for the CD reader. For example, xm block-attach 1 phy:/dev/sr0 hdb r. Put spaces instead of commas between the attach_string parameters.
- Return to the VM’s installation program window and press OK to continue
- Repeat these steps each time the installation program indicates it cannot access the installation media.

Using an Already-Installed Disk Image
In progress.
This page is part of: