Yast Style Guide
İçindekiler
General Information
- Contact: Siegfried Olschner
- You can obtain the complete styleguide draft here (pdf-file)
- Please notice: about this document
- abbreviations
YaST
YaST Elements
| Part of YaST | Abbreviation | Comments |
| YaST Installation Sequence | YIS | |
| YaST Update Sequence | YUP | |
| YaST Configuration Module Suitable for Normal Users | YCM-NU | |
| YaST Configuration Module suitable for Expert Users | YCM-EU | |
| YaST Message Pop Up | YMPU | |
| Special YaST Modules - YaST Online Update |
YOU | |
| Special parts in GUI - YaST Control Center |
YCC YPM |
|
| Special parts in TUI - YaST Ncurses Control Center |
YNCC |
Yast is caught in many constraints
The developers, the user experience experts and the visual designers are called upon to manage a mission with great challenge.
YaST has to:
- provide a Graphical User Interface with the approach to present a professional look & feel with the handicap of the programming language "YCP" (see appendix ***), because a Text User Interface is needed.
- "do" installation and update of an operating system and installation, update and de-installation of many differnt applications
- provide usablility for normal users with a comfortable and quick setup of devices with fine defaults and full configuration in deep and usability for experts
- work on i86 and many other plattforms
Important Limitations
Because YaST ist the main configuration tool for SuSE products, it runs on many different platforms. Thus, already during the design phase, one has to consider some limitations, which result from this independance. The most important limitation is that all YaST modules must also work (and be usable) in text mode. The NCurses frontend for YaST features a 80x25 character resolution. Thus most text must be kept to a bare minimum.
Due to the fact, that YCP has a reduced capacity to design the dialog, the YCC and the YaST Package Installer is made with "qt".
The second important fact to consider is that one can invoke modules from different places. Most of the time, users will use the YaST control center (YCC) to launch the modules. However, modules are also launched during installation, or by clicking your way through the K-Menu. Another possibility is to use the modules embedded in KControl (the KDE control center) or to use them with the NCurses interface. Thus, modules feature a unique design, which has been carefully crafted to accomodate to these limitations.
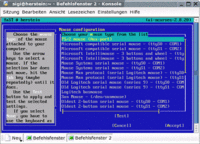
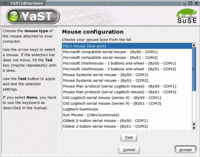
The use of YaST in TUI generates the high number of buttons visible in the dialog pages because in a native GUI the device operations Add, Edit, Delete can be accessible via a right click context menu. In the TUI you have to use buttons.
Goals for appearance
YaST should show
- a young, modern and fresh user interface with a professional unobtrusive design
- clearness and easiness to the normal user
- mightiness to the expert user
Installation via YaST
Installation Workflow (SUSE Linux 9.1)
The installation follows a straight, flat path. The perfect installation would allow to simply click "next" some
times and be done with it.
However, in the real world, a user must provide some input during the installation
process. Usually, YaST launches a module to get and process that input. Afterwards, it returns to the main
path and continues with the installation.
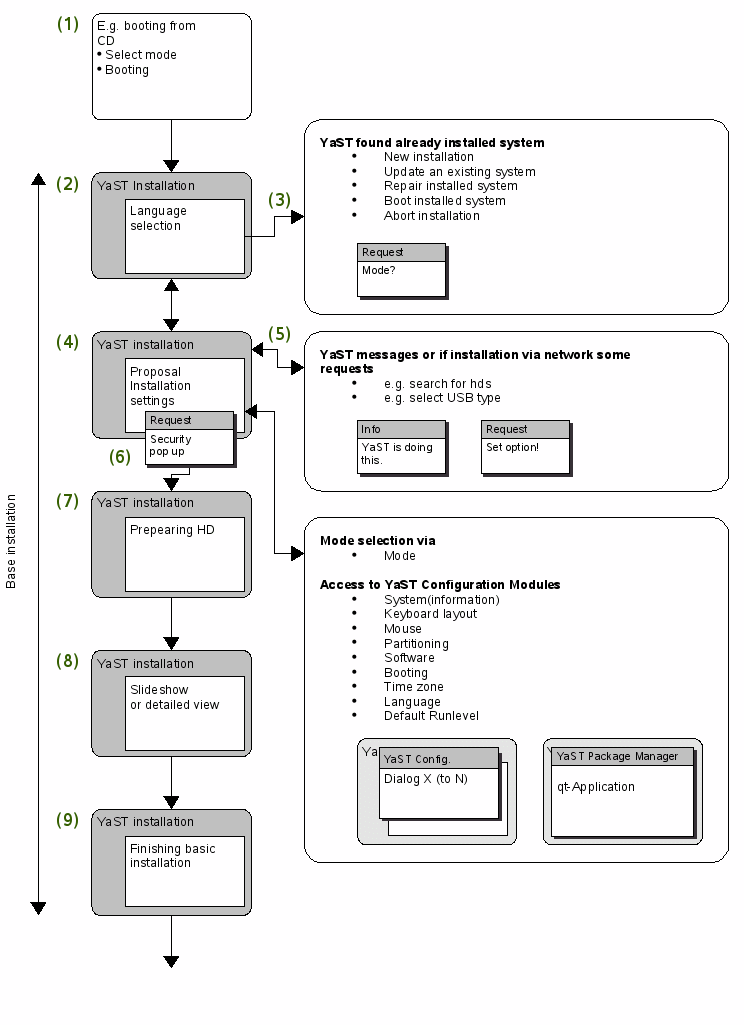
The following pages provide a graphical scheme and comments to the numbers in the illustration of the
YaST Installation Sequence.
Comments:
- Start of installation via CD or DVD. (By the way, YaST provides a very fine feature called SLP installation. Insert the CD or DVD, select SLP and see the list of available installation sources in your network.)
- Language selection is the first “real�? installation options dialog after the initializing sequence. The selection of a language in the selection list has the function of an Apply button. The language is changed immediately.
- Installed system found – this request will be available when YaST has detected an already installed Linux system. There are here several possibilities:
- Make a new installation: an existing Linux installation is completely replaced. Existing user data are lost generally.
- Make an udpate: here on the basis of the existing system an update is accomplished, which - so far possible - takes over user configuration files.
- Repair installed system: this radio button will launch the YaST System Repair Application. Here the user has some possibilities to get his broken system repaired autmatically.
- Boot installed system: the user can select a partition to boot with and has the chance to make a repair manually.
- Abort: this path will leave the installation sequence
- Proposal for installation settings: The second important dialogue in the basis installation path is the suggestion to use default settings. It is called „installation proposal“ and provides links to setup installation mode, hardware and software. It also offers the possibility to get a system information as soon as possible. Following access to YaST Configuration Modules is available in SUSE Linux 9.1:
- System(information)
- Keyboard layout
- Mouse
- Partitioning
- Software
- Booting
- Time zone
- Language
- Default Runlevel
- Information pop ups and request pop ups are shown before the installation proposal dialog is full visible. During a setup YaST will make a hardware scan to get the defaults for the installation dialogs. This could be a time consuming process. So some pop ups will inform the user about the current status. In some cases, e.g. during installation via Network, YaST will have some questions to the user concerning USB devices or other stuff.
- A “Really?�? request pop up will prevent user from unintentional deleting of his data.
- The preparting hard disks dialog is used to give a feedback on the current status of hard disk formating process.
- Slideshow sequence: The slideshow sequence has a dual task. First of all it can inform new users about the powerfull Linux applications and secondly – in detail mode - it can provide an exact installation status to expert users.
- Finishing basic installation: Another feedback dialog to provide a clear status information. SuSEconfig is running.
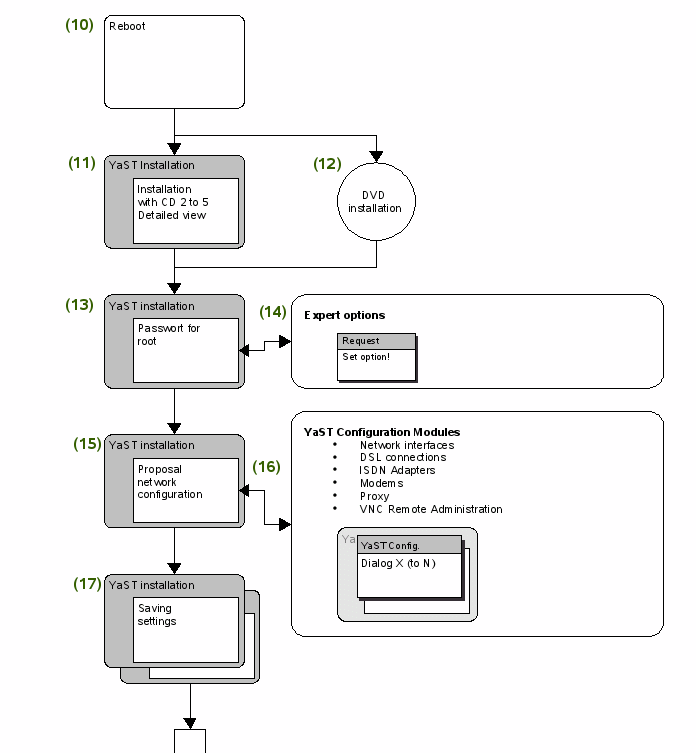
- Reboot
- Installation from CD second part: Some files need a running system to be copied into. These files are copied after the reboot. There is no slideshow available during this part.
- Installating via DVD: it is not necessary to change CDs. Installation will go on with detailed view *** not clear „boot after DVD has finished?“
- Password for root: The root password has to specified for a particular machine. This is true regardless of whether or not there is a networked user authentification for normal users.
- Expert options for root: These expert options concern the root password's security. Usually, there is no need to change them.
- Proposal Network setup: The proposal displays the autodetected settings for all found network hardware. One can change these settings to include non-autodetectable hardware or to suit special needs. The layout is similar to the installation proposal (4).
- Available YaST Configuration Modules: Just like in the installation proposal, the different configuration modules can be reached with a single mouse click. the The modules in the proposal are:
- Network interfaces
- DSL connections
- ISDN Adapters
- Modems
- Proxy settings
- VNC Remote Administration
- Saving Settings information screen: This screen is a typical progress dialouge
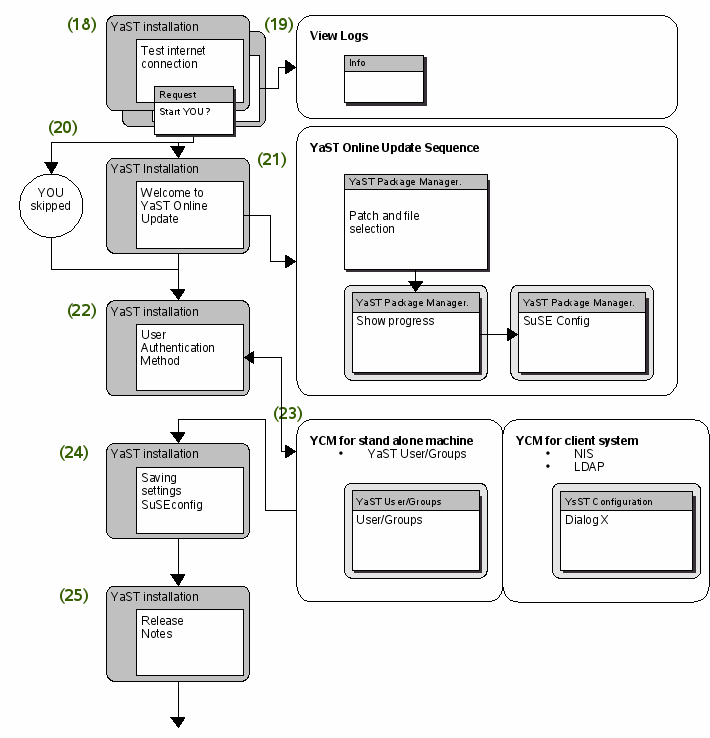
- Test internet connection: After the network has been configured, one can verify the settings by testing an internet connection. YaST then tries to reach a SUSE server, which also hosts available updates (see (20))
- Log view: The option to view the log files is available in (19). Usually it is quite uniteresting but it can prove useful, if the internet connection has failed.
- YaST Online Update: If the internet connection works properly, YaST can check for online updates via YOU. If a user runs YOU (the default setting), it downloads availabe updates and installs them. This step (and step (21) accordingly) can be skipped.
- YaST Online Update Sequence: A YOU update consists of four sequential steps:
- Download available mirrors and set general options
- Display available patches and allow to select or deselect some patches. Critical (i.e. security relavant) patches are marked in red, recommended patches in blue and optional patches are displayed in black.
- Display download progress.
- Run SuSEconfig
- User Authentication Method: YaST offers two different ways of user authentification. One is applicable for stand-alone machines (local storage of users and passwords), whereas the other one applies to computers using networked authentification (i.e. company intranets).
- Different path – Stand alone machine vs. Client: Depending on the choice in (22) the configuration path branches for some dialouges. After all dialouges concerning authentification have finished the path merges again.
- Saving Settings: see (21)
- Release Notes: If there are important informations, which were too late to be printed in the manual, they are displayed in the release notes. Also, some other crucial information is presented here.
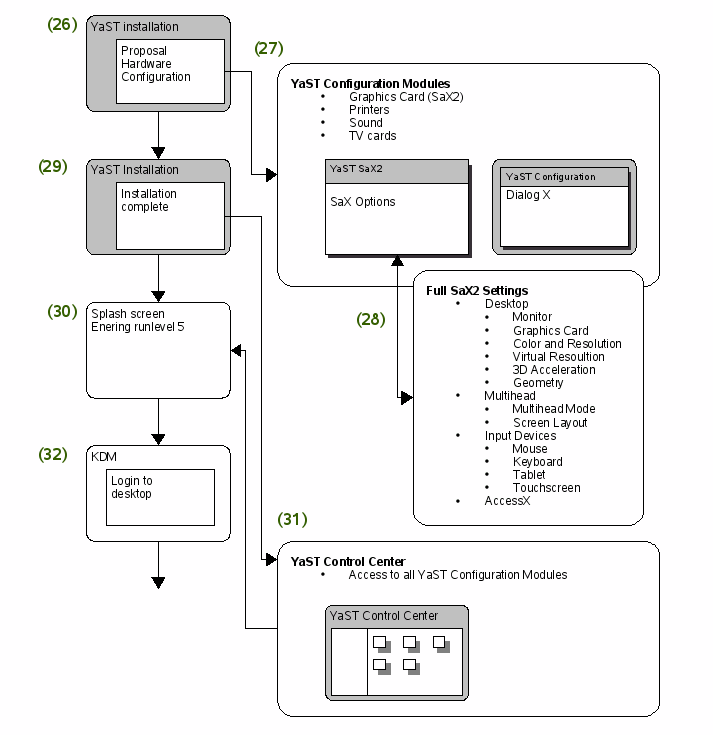
- Proposal Hardware Configuration: YaST tries to autodetect the available hardware connected to the computer. The found hardware is displayed in a proposal.
- YaST Configuration Modules and SaX2: The modules in the hardware proposal are:
- Graphics Card (SaX2)
- Printers
- Sound
- TV Cards
- Full access to SaX2 Configuration: The graphics card module launches SaX2, the X-configuration utility. All settings concerning the graphical display (as opposed to the text only console) are collected in this utility.
- Installation complete: After the installation has completed, YaST displays one last dialog, the finish screen. It informs a user that the installation has finished and that he can start using the computer now. If also features the option to start the YaST control center (YCC) after KDE has started.
- YaST Control Center: The YCC offers a single point of entry to all different configuration options in an installed system.
- Entering runlevel 5: Runlevel 5 is the default runlevel of a SUSE Linux system. It starts the computer in a networked, graphical environment.
- Login: Once, the graphical environment has started, the user can login using either the manually specified login (stand-alone machine) or a login using network authentification.
